Image Clarity Meters
Image Clarity Meters are used to determine the optical effect of test specimen’s surface structure on color appearance properties. Surface structure effects includes optical phenomenon as clarity, DOI and orange peel.
What is Image Clarity (Reflexibility) ?
Image clarity (reflexibility) is the degree of clarity and lack of distortions of an image of an object appearing on a coated / colored aluminum surface or through a translucent film, plastic and so on. The cleaner the image, the higher the value will be.
Measurement of Image Clarity (Reflexibility)
Image clarity is determined by obtaining values M and m, then applying them to a formula. Image Clarity Meter calculates these values internally and displays the result on its screen.
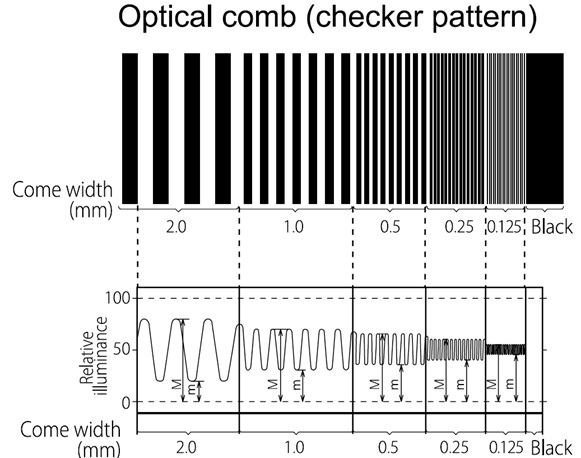
Example of the light signal from the specimen
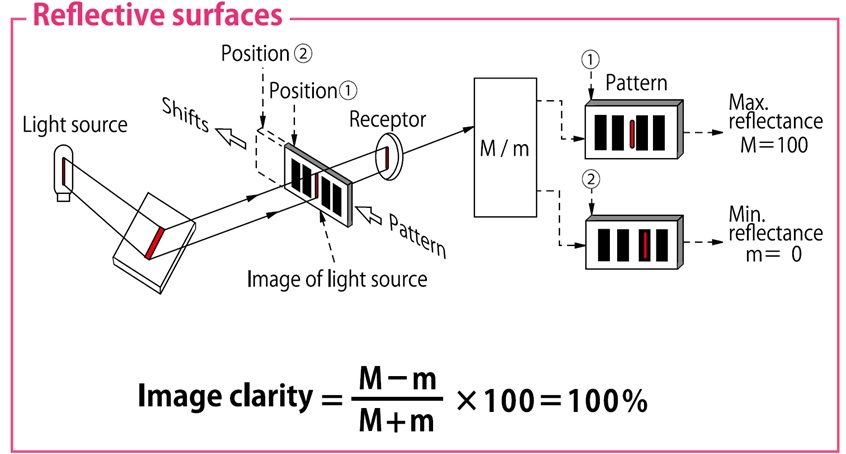
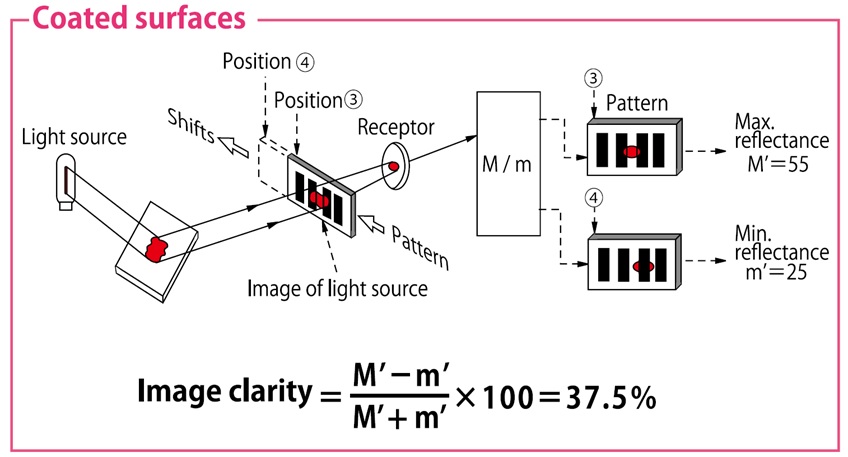
Example of measuring the image clarity (reflexibility) of a color alumite plate

Example of measuring the films : comparison between the image clarity (transmittance) and the haze
The image clarity (transmittance) may be different even when the haze value is the same.
This is because the method for measuring the haze and the image clarity differ.
Therefore, it is important to perform the test that correlates best with human vision.
Tt : Total luminous transmittance
Td : Diffuse luminous transmittance
C% : Image clarity (comb width 2mm)

Example of measuring different materials : comparison between the image clarity (transmittance) and the gloss
The image clarity (transmittance) may be different when the test specimen have equal gloss. This is because the method for measuring the gloss and the image clarity are different. Therefore, it is important to use the material by measuring it with the method that best correlates with human vision.
Gs (60°)% : 60 degrees specular glossiness
C% : Image clarity (comb width 0.25mm)
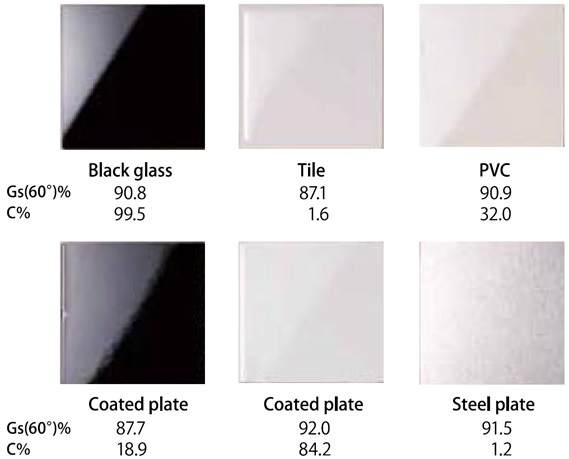
Image Clarity MeterICM-1T
Test standard : ISO 10216, ISO 17221, ASTM D5767, JIS H 8686-2, JIS K 7374
With the highly precise optics design and technology, the ICM-1T is capable of accurately expressing the delicate image clarity in a numerical value. It prides with high reproducibility and tolerance at minimum optical mask width of 0.125 mm. Reference standard plate (as specified in JIS K 7374) comes as a standard attachment, allowing the user to confirm the accuracy of the instrument's measurement at any time.
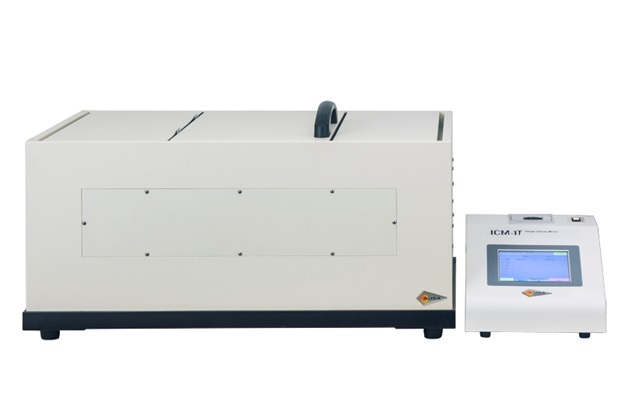
Diagram of measurement using the reflection method
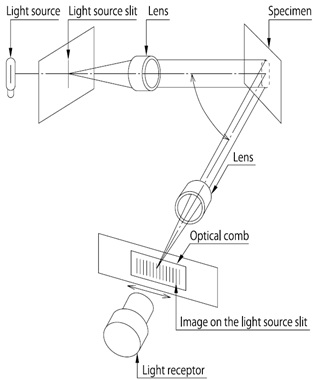
Diagram of measurement using the transmittance method
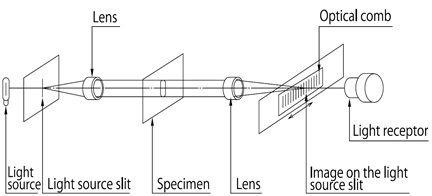
Source : JIS K 7374:2007 Plastics - Determination of image clarity
Specification
| Measuring method (application) | Transmittance (plastic films etc.) and reflectance (coatings, paintings, colored aluminum, paper, films for LCD etc.) |
| Values to be measured | Image clarity C%, maximum reflectance (transmittance) M, minimum reflectance (transmittance) m |
| Measuring angles | Reflectance : 45°incidence and viewing, or 60°incidence and viewing (switchable between the two) |
| Transmittance : 0°incidence and viewing of transmitted light | |
| Slit | 0.03mm (JIS K 7105, JIS K 7374) or 0.1mm (ISO 10216), either to be selected upon request. |
| Aperture diameter | φ25mm |
| Optical comb width | 0.125mm, 0.25mm, 0.5mm, 1.0mm, 2.0mm |
| Tolerance | Standard deviation of C within 0.2% (after a transmittance test of the empty chamber with the optical comb width of 0.125mm) |
| Electrical requirements | Single phase, 100V, approx.2A |
| External dimensions and weight | Optical unit : W70 x D48 x H31cm, 35kgs (W27.6 x D18.9 x H12.2in, 77lbs) |
| Measurement unit : W23 x D23 x H16cm, 4kgs (W9.1 x D9.1 x H6.3in, 9lbs) |
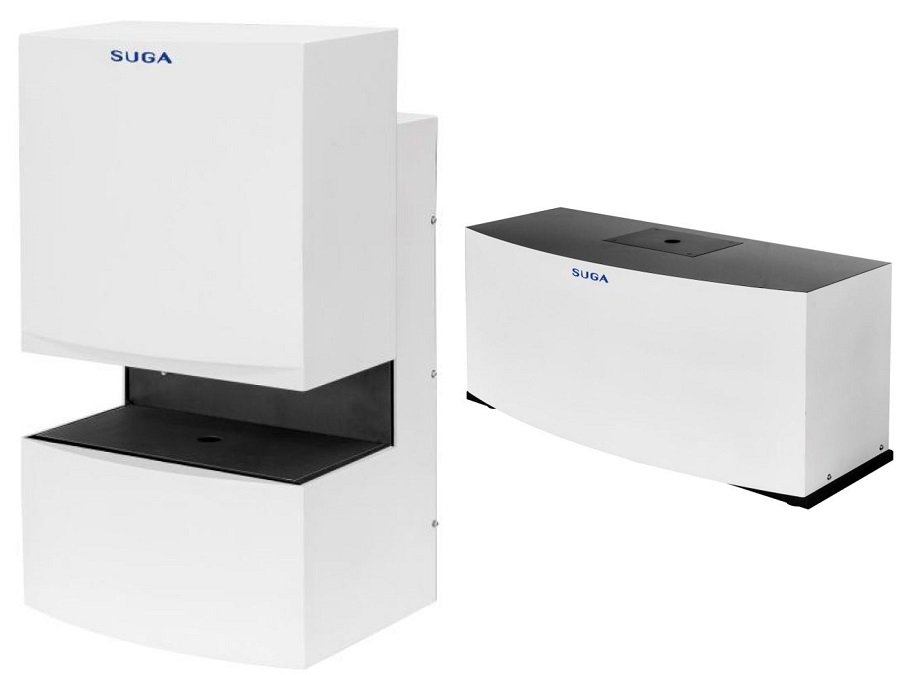
Image Clarity MeterIC-T / IC-45 / IC-60
Test standard : ISO 17221, ISO 20266
The Image Clarity Meters measure the clarity of the image on the surface of an object or the image of an object that can be seen through transparent film, plastic, etc. Suitable for controlling the surface condition of transparent films for liquid crystal screens, painted surfaces, photographic printing paper, glossy paper for inkjet, etc., and for quality control that emphasizes the finished aesthetics of products. The operation is performed with the dedicated software installed on PC, and the data is managed on the PC too.
Features
Only 5 Seconds Measurement (PAT.)
Measurement time was shortened to only about 5 seconds by increasing the motor speed.
LED Light Source - No lamp replacement required
No lamp replacement is required because the light source is a high color rendering white LED. Maintenance-free and stable measurement.
Dedicated to Transparency (IC-T) and Reflectance (IC-45 / IC-60)
Since these are dedicated instruments tailored to the properties of the sample, they can perform measurements on large samples, as well as on any sample size or shape. The main unit is compact and space-saving.
Measurement Control and Data Management with the Dedicated Software
The operation is easily performed with the dedicated software installed on PC, and the data is managed on the PC too.
| Model | IC-T | IC-45 | IC-60 |
| Measureing angles | 0°incidence and viewing of transmitted light | 45°incidence and 45°viewing | 60°incidence and 60°viewing |
| Measuring item | C(n) : Image clarity % at optical mask width n(mm) Mn : Maximum relative light intensity at optical mask width n(mm) mn : Minimum relative light intensity at optical mask width n(mm) |
||
| Light source slit | 0.03mm | ||
| Optical mask width | 0.125mm, 0.25mm, 0.5mm, 1.0mm, 2.0mm | ||
| Aperture diameter | φ25mm | ||
| Measuring time | Approx. 5 seconds (including sensitivity adjustment will be total 10 seconds) | ||
| Tolerance | Standard deviation of C(0.125) within 0.2% (After continuous transmittance measurement of the empty chamber 30 times) | Standard deviation of C(0.125) within 0.2% (After continuous reflectance measurement of the black polished glass 30 times) | |
| Power source | AC100 ~ 240V, approx. 200VA, 50Hz/60Hz | ||
| Light source | White LED | ||
| Light receptor | Combination of silicon photodiode and filter | ||
| Interface | USB 2.0B terminal | ||
| Dimensions | Approx. W32xD23xH48cm (W13 x D9 x H19inch) |
Approx. W70 x D20 x H35cm (W27.6 x D7.9 x H13.8inch) |
|
| Operating mass | Approx.16kg (35.3lbs) | Approx. 14kg (30.9lbs) | |
| Test standard | ISO 17221* / ISO 20266** | ||
*ISO 17221 Plastics - Determination of image clarity (degree of sharpness of reflected or transmitted image)
**ISO 20266 Paints and varnishes - Determination of image clarity (degree of sharpness of reflected or transmitted image)
***The specifications above are subject to change without notice.
